
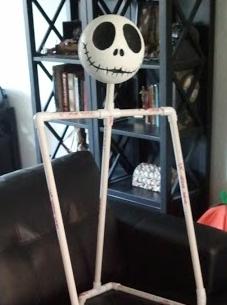
What Nightmare Before Christmas fan wouldn’t love this life-sized prop in their front lawn for Halloween? Kristie found a low-cost way to produce a quality prop that you can use indoors or out. And the best part? She did it all for around $25!

DIY Parts List
Here is a list of the PVC fittings and lengths needed:
- (2) Upper Leg 24 in
- (2) Lower Leg 32 in
- (4) 90 Degree PVC joint for Shoulder & Hip Joints
- (5) 45 Degree PVC joint for Opposite Shoulder, Knees & Elbows
- (1) Neck 4 in
- (1) PVC Cross Joint
- (2) Upper Arm 24 in
- (2) Collar 8 in
- (1) Pine 24 in
- (1) PVC “T” Joint
- (2) Hip 1 in


The hands were purchased from Party City and modified with wire to make them posable.


For complete instructions, check out Kristie’s assembly instructions here.
Images by DIY Nightmare Before Christmas Props
Our big thanks to Kristie for sharing!
You can share this using the e-mail and social media re-share buttons below. Thanks!
See The Latest: Go Back Home to See Our Latest Halloween Displays.
