Check out this crafty DIY tutorial that teaches you how to make an awesome graveyard using cheap dollar store foam Halloween tombstones.
Give your store-bought props a major upgrade!
Eduardo of Monster Tutorials shows you everything you need to make thicker AND sturdier tombstones for a better-looking graveyard that doesn’t blow away.
Upgrade Dollar Store Halloween Tombstones With This DIY Tutorial

Images by Monster Tutorials / YouTube
The idea is to add two extra layers of foam to your cheap Dollar Store Halloween tombstones, and sandwich a stake between the layers for extra support when staking into the ground.

The layers can be made with packaging foam…

…or sheets of panel foam insulation from Lowes.

Each piece of panel foam is roughly 1/2 inch to 3/4 of an inch thick.

Start by cutting two pieces of foam the exact same length as your original tombstone.


Mark the outside edges of the original tombstone’s base to find the center.

The center is where you’ll cut a slot for the PCV pipe that will hold your ground stake later on.

Measure up from the base about 6 to 8 inches to create a straight line towards the center.

Eduardo is using this heavy grade, hurricane-withstanding piece of rebar that measures 12 inches long!

With this piece of electrical conduit (instead of PVC because it’s cheaper), you’ll create a sleeve inside the tombstone for the rebar.

Slice it at about 6 to 8 inches in length with a hack saw!


Put the conduit along the centerline you just drew, and flush along the bottom edge of your foam sheet. Cut a hole around the perimeter.


Do you see how the pieces will fit together?


Now you’re ready to glue it down!

Instead of using heavy-duty glue, use a bathroom silicone. It works great because it dries in only 30 minutes.

First, glue the original tombstone to one side of the middle foam board (with the precut hole for the PVC/conduit stake)…

Then flip it over and glue the second foam sheet to the back!


Add some weight to your foam sandwich and let it sit for at least 30-45 minutes.

You might want to assign someone to keep a close eye on the drying process…

Once the glue sets, cut around the perimeter of your original Dollar Store Halloween tombstone.


It’s OK if you have imperfections, it’ll look like broken and decaying stone!

Take your time, I know you’re just DYING to finish!


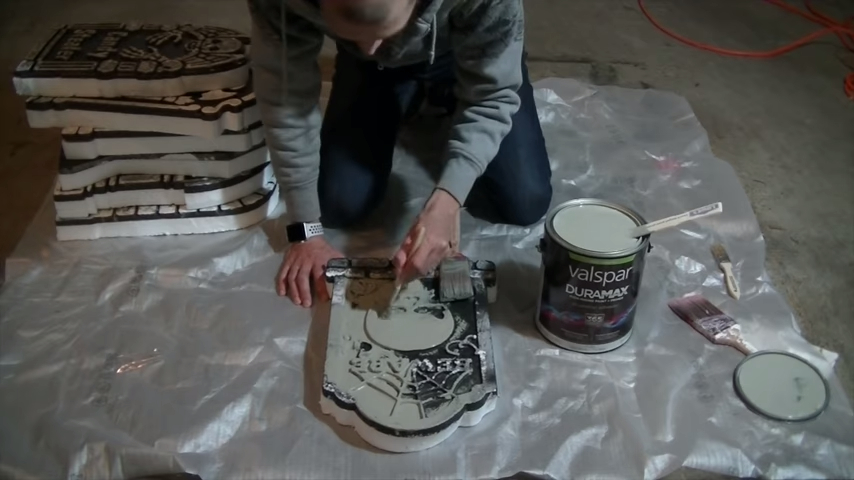
Now it’s time to paint! Choose an exterior, all-weather paint so it withstands the elements.

Eduardo found a gallon marked down in price after someone ordered from Lowes but didn’t like the color!

With a brush, get inside all the edges and crevices.


The front and back are looking good so far!


Add some distressing to your tombstone using a spray bottle mixed with 1 cup of water and about 2 spoonfuls of black paint.

Rest your tombstone standing upwards so the paint drips down for a more authenticly creepy look!


See how the paint puddles naturally in the crevices!

For added “weathering” and rust, dab brown, moss green and white paints around the edges with a sponge.


It helps to tear away pieces of your sponge with a fingernail so the paint doesn’t lay down so evenly.

Dab your greens and browns towards the bottom of the tombstone where dirt and soil might have splashed for centuries on rainy days in the graveyard!

And add white along the edges where time and water have worn away the concrete, exposing fresh layers below.

Muahaha – You’re almost through!

Now it’s time to lay your tombstones out in the graveyard and stake them into the ground!


Get your creepy, candy steelin’, Count Dracula hands out of my graveyard! RIP.

Thank you Eduardo for keeping it real (and cheap) for us DIY Halloween Tombstone Haunters!

Images by Monster Tutorials / YouTube
Our big thanks to Monster Tutorials again for thinking outside the box on this one!
Feel free to comment below to ask any questions about how to create tombstones like these of your own.
You can share this using the e-mail and social media re-share buttons below. Thanks!
See The Latest: Go Back Home to See Our Latest Halloween Displays.


ALL I CAN SAY IS AWESOME!
I LOVED DOING THIS WITH MY DAUGHTER AND NOW WE CAN SAVE FOR NEXT YEAR!
THANK YOU SO MUCH!!!!
Thanks Jesse! You’ll have to come back and share some photos of what you came up with 🙂